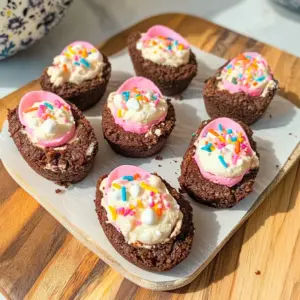
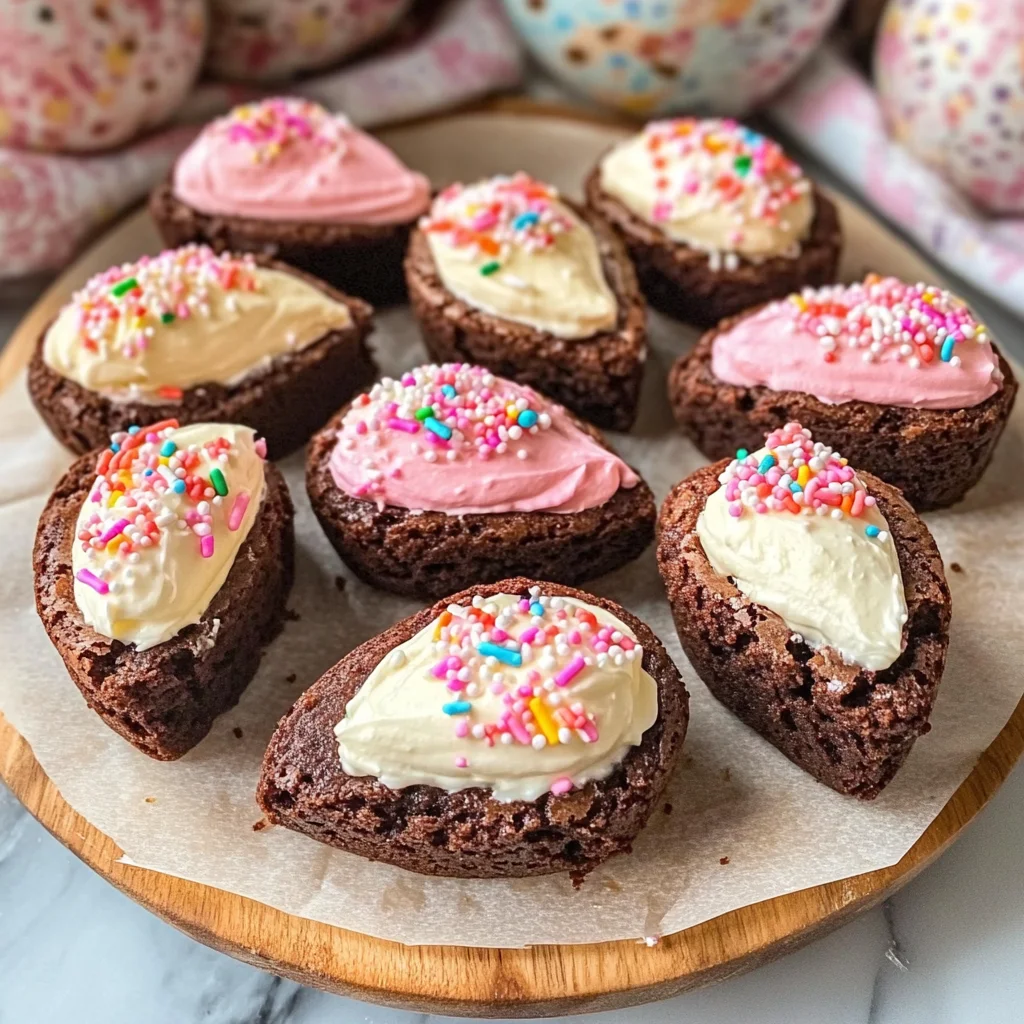
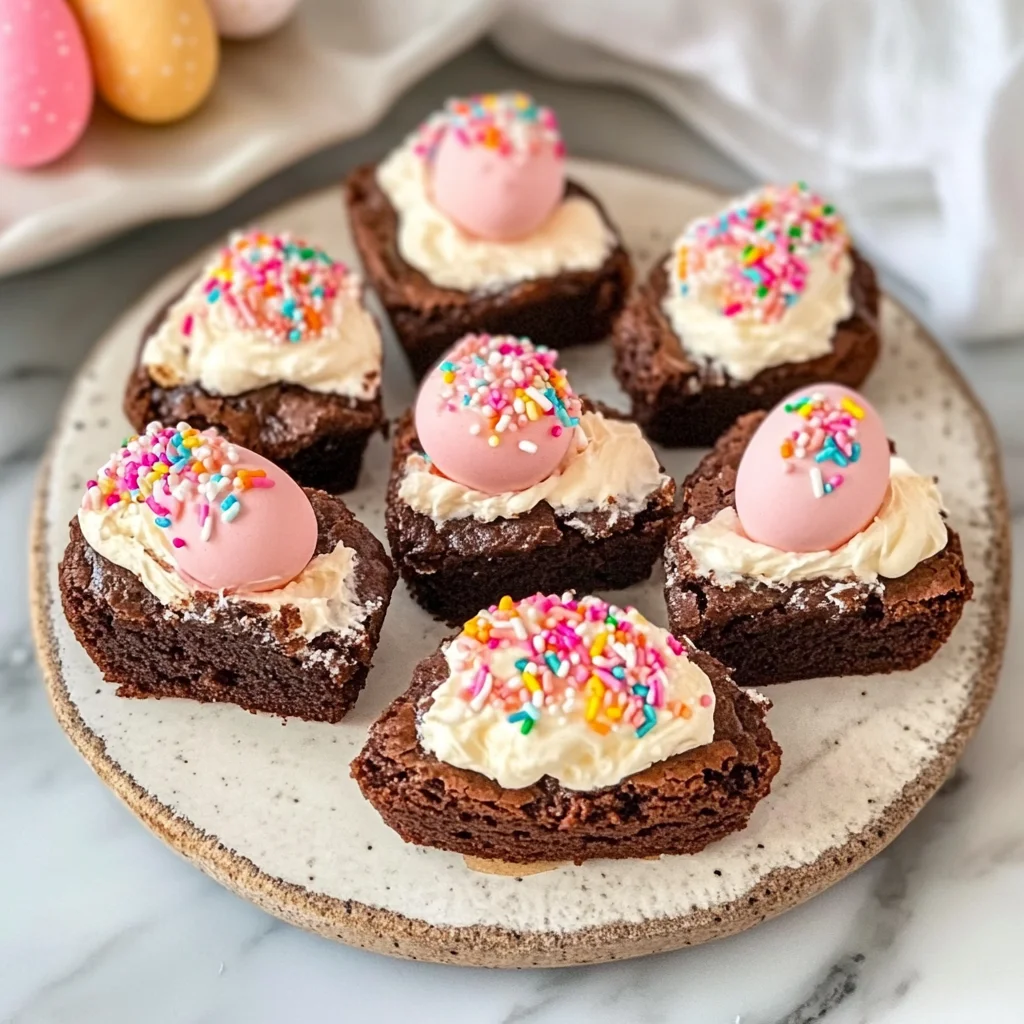
Easy Easter egg shaped brownies with a cream cheese vegan marshmallows filling. These Deviled Brownies are an adorable treat perfect for any celebration, especially Easter. They combine the rich flavor of brownies with a delightful creamy center, making them not only tasty but visually appealing. Ideal for gatherings or as a fun activity with kids, these brownies are sure to impress!

Jump to:
- Why You’ll Love This Recipe
- Tools and Preparation
- Essential Tools and Equipment
- Importance of Each Tool
- Ingredients
- How to Make Deviled Brownies
- Step 1: Preheat the Oven
- Step 2: Prepare Brownie Batter
- Step 3: Grease Silicone Molds
- Step 4: Bake the Brownies
- Step 5: Create Indentations
- Step 6: Cool Completely
- Step 7: Release from Molds
- Step 8: Flatten if Needed
- Step 9: Prepare Filling
- Step 10: Pipe Filling
- Step 11: Refrigerate
- How to Serve Deviled Brownies
- For a Festive Celebration
- With Ice Cream
- As Party Favors
- How to Perfect Deviled Brownies
- Best Side Dishes for Deviled Brownies
- Common Mistakes to Avoid
- Storage & Reheating Instructions
- Refrigerator Storage
- Freezing Deviled Brownies
- Reheating Deviled Brownies
- Frequently Asked Questions
- What are Deviled Brownies?
- How do I customize my Deviled Brownies?
- Can I use a different type of brownie mix?
- How do I ensure my Deviled Brownies come out perfect every time?
- Can I make these brownies ahead of time?
- Final Thoughts
- 📖 Recipe Card
Why You’ll Love This Recipe
- Quick and Easy: With just a box mix and a few simple ingredients, you can whip up these delicious treats in no time.
- Festive Presentation: The egg-shaped design adds a festive touch that’s perfect for Easter celebrations.
- Creamy Filling: The combination of cream cheese and vegan marshmallows creates a rich, smooth filling that elevates the brownie experience.
- Kid-Friendly Fun: Involving kids in the decoration process makes this recipe a fun family activity.
- Customizable Toppings: You can add sprinkles or other toppings to match your occasion, making each batch unique.
Tools and Preparation
Before you start making your Deviled Brownies, gather your tools to ensure a smooth baking experience.
Essential Tools and Equipment
- Egg-shaped silicone molds
- Nonstick cooking spray
- 2 tablespoon portion scoop
- Toothpick
- Mixing bowl
- Electric mixer
- 18-inch pastry bag with 1M piping tip
Importance of Each Tool
- Egg-shaped silicone molds: These molds help create the perfect brownie shape, ensuring they come out easily without breaking.
- Electric mixer: A powerful mixer blends the cream cheese and marshmallow filling quickly and smoothly.
- Toothpick: This simple tool is essential for checking if your brownies are baked perfectly.
Ingredients
Ingredients:
– 18.3 oz brownie mix and ingredients to make brownies usually water (oil, and eggs)
– 8 oz cream cheese, softened
– 7 oz vegan marshmallows cream
– Sprinkles, optional
How to Make Deviled Brownies
Step 1: Preheat the Oven
Preheat your oven to 350°F. This ensures that your brownies bake evenly.
Step 2: Prepare Brownie Batter
Prepare the brownie batter according to package directions using water, oil, and eggs as instructed.
Step 3: Grease Silicone Molds
Grease the egg-shaped silicone molds well with nonstick cooking spray to prevent sticking. Use a 2 tablespoon portion scoop to fill each cavity evenly.
Step 4: Bake the Brownies
Bake for 24 to 26 minutes, or until a toothpick inserted in the center comes out clean.
Step 5: Create Indentations
Once you remove the brownies from the oven while they are still hot, use a 1/2 teaspoon to gently press into the center of each brownie to create a divot for filling.
Step 6: Cool Completely
Let the brownies cool completely in the mold—do not rush this step as it helps maintain their shape.
Step 7: Release from Molds
Once fully cooled, carefully pull back on the silicone mold and invert it to release each brownie egg.
Step 8: Flatten if Needed
Lightly press the bottom of each brownie egg on a flat surface to flatten slightly since they may be rounded.
Step 9: Prepare Filling
Beat together cream cheese and vegan marshmallows cream until smooth. Scrape down the sides as needed for an even texture.
Step 10: Pipe Filling
Transfer filling into an 18-inch pastry bag fitted with a 1M piping tip. Pipe filling into each brownie divot and top with sprinkles if using.
Step 11: Refrigerate
Refrigerate until ready to serve. Enjoy your delicious Deviled Brownies!
How to Serve Deviled Brownies
Deviled brownies are a delightful treat that can be enjoyed in various ways. Whether it’s for an Easter celebration or a casual get-together, these brownies can be dressed up or down to suit the occasion.
For a Festive Celebration
- Decorative Platter: Arrange the deviled brownies on a colorful platter with fresh flowers or seasonal decorations for a vibrant presentation.
- Easter Egg Hunt: Hide the brownies around your garden or home as sweet surprises for kids during an Easter egg hunt.
With Ice Cream
- Brownie Sundae: Top warm deviled brownies with a scoop of vanilla or chocolate ice cream for a decadent dessert.
- A La Mode: Serve with a drizzle of chocolate sauce and whipped cream for an indulgent treat.
As Party Favors
- Individual Wrapping: Wrap each brownie in decorative tissue paper or clear bags tied with ribbon for guests to take home.
- Personalized Tags: Attach tags with fun messages or the recipe link so your guests can recreate the magic at home.
How to Perfect Deviled Brownies
To ensure your deviled brownies turn out just right, follow these helpful tips. These pointers will enhance flavor and presentation, making your treats irresistible.
- Use Quality Ingredients: Opt for high-quality brownie mix and fresh cream cheese to elevate the taste.
- Don’t Rush Cooling: Allow the brownies to cool completely in the molds before removing them; this prevents breakage.
- Press Gently: When creating divots, apply gentle pressure to avoid tearing the brownie.
- Experiment with Fillings: Try different flavors of vegan marshmallow cream for varied taste profiles that surprise your guests.
- Adjust Bake Time: Keep an eye on your oven; baking times may vary slightly based on different oven types, so check frequently.
- Store Properly: Keep any leftover brownies in an airtight container in the refrigerator for maximum freshness.
Best Side Dishes for Deviled Brownies
Pairing side dishes with deviled brownies can create a delightful balance of flavors. Here are some great options that complement these sweet treats perfectly.
- Fresh Fruit Salad: A mix of seasonal fruits provides a refreshing contrast to the richness of brownies.
- Whipped Coconut Cream: This light topping adds a tropical flair and pairs beautifully with chocolate desserts.
- Chocolate Dipped Strawberries: These elegant bites are easy to make and enhance the chocolate experience.
- Nutty Granola Bars: A crunchy side offers texture and can be perfect for those who enjoy something less sweet alongside their dessert.
- Vanilla Yogurt Parfait: Layer yogurt with berries and granola to create a creamy, satisfying side that balances sweetness.
- Mini Cheesecake Bites: These tangy treats provide a lovely contrast and make an excellent addition to any dessert table.
Common Mistakes to Avoid
Making Deviled Brownies can be a delightful experience, but there are some common pitfalls to watch out for.
- Boldly skip the cooling step: It’s tempting to rush the cooling process, but letting your brownies cool completely ensures they hold their shape when removing from the molds.
- Boldly ignore the measurements: Always measure your ingredients accurately. Too much or too little of any component can affect the texture and taste of your brownies.
- Boldly overlook greasing the molds: Not greasing your silicone molds properly can lead to sticking. Use nonstick cooking spray generously to ensure easy removal.
- Boldly skip the divot creation: Forgetting to create a divot in the brownies means no space for that delicious filling! Remember to press gently while they are still hot.
- Boldly forget about customization: Don’t hesitate to add your personal touch! Experiment with different fillings or toppings to make these brownies uniquely yours.
Storage & Reheating Instructions
Refrigerator Storage
- Store Deviled Brownies in an airtight container.
- They will last up to 5 days in the refrigerator.
Freezing Deviled Brownies
- Wrap each brownie individually in plastic wrap and then place them in a freezer-safe bag.
- These brownies can be frozen for up to 3 months.
Reheating Deviled Brownies
- Oven: Preheat to 350°F and warm for about 10 minutes, covered with foil.
- Microwave: Heat each brownie for about 15-20 seconds on medium power for a quick warm-up.
- Stovetop: Place on a skillet over low heat, covering with a lid for 5-7 minutes until warmed through.
Frequently Asked Questions
Here are some common questions about Deviled Brownies that might help you in your baking journey!
What are Deviled Brownies?
Deviled Brownies are rich, fudgy brownies filled with a creamy mixture of cream cheese and vegan marshmallows, making them a delightful treat.
How do I customize my Deviled Brownies?
You can customize these brownies by adding different toppings like chocolate chips or nuts, or even using flavored cream cheese.
Can I use a different type of brownie mix?
Yes! Feel free to experiment with various brownie mixes or make your own from scratch if you prefer.
How do I ensure my Deviled Brownies come out perfect every time?
Follow the instructions carefully, especially regarding cooling times and measurements, and be sure not to rush any steps.
Can I make these brownies ahead of time?
Absolutely! You can prepare them a few days in advance or freeze them for longer storage. Just remember to thaw before serving!
Final Thoughts
These Deviled Brownies are not only fun and festive but also versatile enough for any occasion. Whether you’re celebrating Easter or just indulging yourself, don’t hesitate to try this recipe. Feel free to customize with your favorite flavors and toppings!
Did You Enjoy Making This Recipe? Please rate this recipe with ⭐⭐⭐⭐⭐ or leave a comment.
📖 Recipe Card
Print
Deviled Brownies
- Total Time: 46 minutes
- Yield: Approximately 12 servings 1x
Description
Indulge in the delightful world of Deviled Brownies, where rich, fudgy chocolate meets a luscious cream cheese and vegan marshmallows filling. Perfectly shaped like Easter eggs, these treats are not only visually appealing but also bursting with flavor. Easy to make and fun to decorate, they are ideal for family gatherings or special celebrations. With just a few simple ingredients, you can whip up a batch that will impress both kids and adults alike. Whether you’re planning an Easter celebration or simply craving a sweet treat, these Deviled Brownies are sure to satisfy your dessert desires.
Ingredients
- 18.3 oz brownie mix (plus ingredients as directed)
- 8 oz cream cheese, softened
- 7 oz vegan marshmallows cream
- Sprinkles (optional)
Instructions
- Preheat your oven to 350°F.
- Prepare brownie batter according to package instructions using water, oil, and eggs.
- Grease egg-shaped silicone molds with nonstick cooking spray.
- Fill each mold with brownie batter using a 2 tablespoon portion scoop.
- Bake for 24-26 minutes until a toothpick comes out clean.
- While hot, create indentations in the center of each brownie for filling.
- Let brownies cool completely before removing from molds.
- Beat together cream cheese and vegan marshmallows cream until smooth.
- Pipe the filling into each brownie divot and top with sprinkles if desired.
- Refrigerate until ready to serve.
- Prep Time: 20 minutes
- Cook Time: 26 minutes
- Category: Dessert
- Method: Baking
- Cuisine: American
Nutrition
- Serving Size: 1 serving
- Calories: 160
- Sugar: 9g
- Sodium: 120mg
- Fat: 7g
- Saturated Fat: 3g
- Unsaturated Fat: 4g
- Trans Fat: 0g
- Carbohydrates: 21g
- Fiber: 1g
- Protein: 2g
- Cholesterol: 15mg