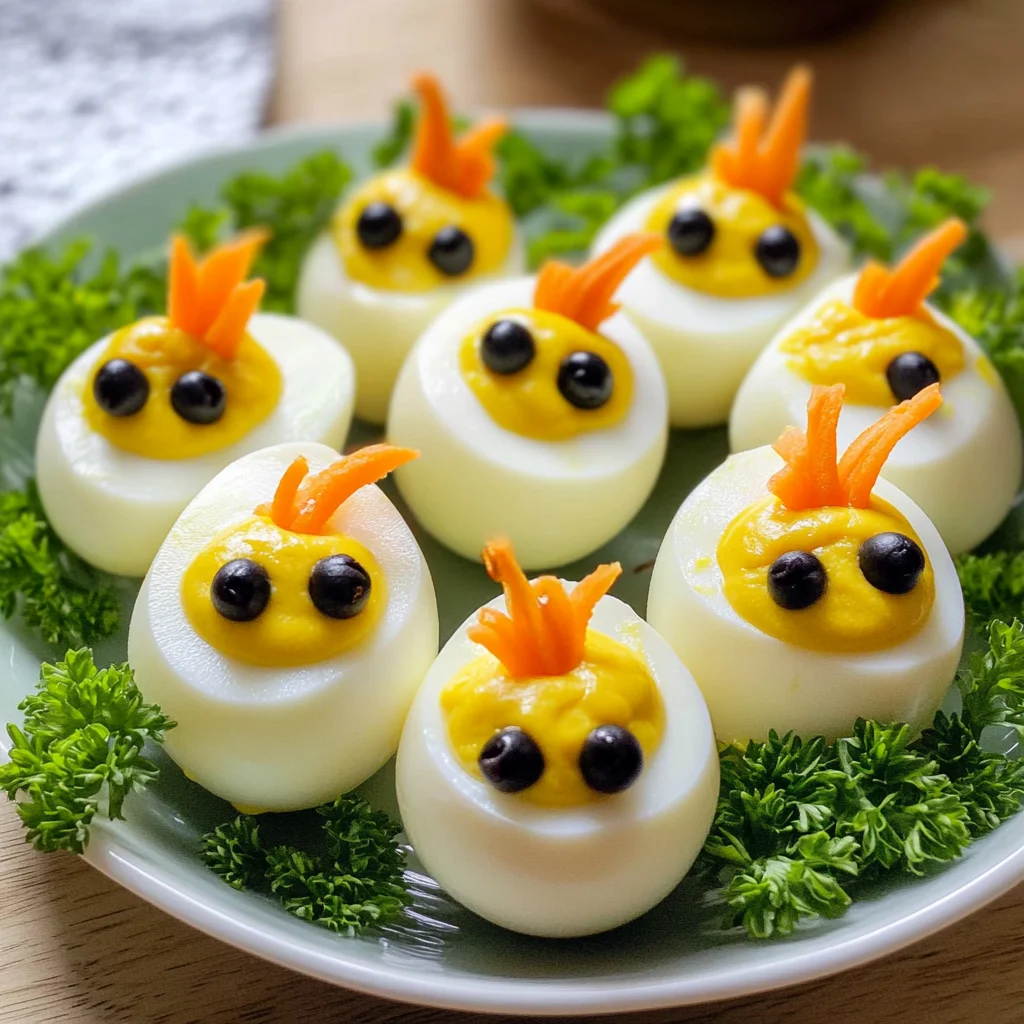
Easter Egg Recipe – Deviled Egg Chicks are a delightful and creative addition to your holiday celebrations. These adorable egg chicks are not only visually appealing but also bring a fun twist to traditional deviled eggs. Perfect for Easter brunch, family gatherings, or any festive occasion, these cute chicks will surely be the star of the table!
Jump to:
- Why You’ll Love This Recipe
- Tools and Preparation
- Essential Tools and Equipment
- Importance of Each Tool
- Ingredients
- Eggs and Filling
- Decorations
- How to Make Easter Egg Recipe – Deviled Egg Chicks
- Step 1: Prepare the Eggs
- Step 2: Make the Filling
- Step 3: Assemble Your Chick Eggs
- Step 4: Decorate Your Chick Eggs
- How to Serve Easter Egg Recipe – Deviled Egg Chicks
- On a Colorful Platter
- With Dipping Sauces
- As Part of a Brunch Spread
- Garnished with Edible Flowers
- In Individual Cups
- How to Perfect Easter Egg Recipe – Deviled Egg Chicks
- Best Side Dishes for Easter Egg Recipe – Deviled Egg Chicks
- Common Mistakes to Avoid
- Storage & Reheating Instructions
- Refrigerator Storage
- Freezing Easter Egg Recipe – Deviled Egg Chicks
- Reheating Easter Egg Recipe – Deviled Egg Chicks
- Frequently Asked Questions
- How do I make my deviled egg filling creamier?
- Can I customize my deviled egg chick decorations?
- How do I ensure my egg yolks blend smoothly?
- How long do deviled eggs last?
- Final Thoughts
- 📖 Recipe Card
Why You’ll Love This Recipe
- Adorable Presentation: These deviled egg chicks are sure to impress your guests with their cute and colorful design.
- Easy to Prepare: With simple steps and readily available ingredients, anyone can make these charming treats.
- Versatile Flavor: The creamy filling with a hint of mustard and garlic adds a delicious flavor that appeals to both kids and adults.
- Fun for All Ages: Making these chick-shaped eggs is a fun activity for families or friends to enjoy together during the holidays.
- Perfect for Any Occasion: While they shine at Easter, these deviled egg chicks can brighten up any gathering or party.
Tools and Preparation
To prepare your Easter Egg Recipe – Deviled Egg Chicks, you’ll need some essential tools that will make the process easier and more efficient.
Essential Tools and Equipment
- Sharp knife
- Plastic straw
- Medium mixing bowl
- Ziploc or pastry bag
Importance of Each Tool
- Sharp knife: A sharp knife is crucial for cleanly cutting the eggs without damaging them, ensuring a neat look for your deviled egg chicks.
- Plastic straw: This handy tool helps you easily create perfect little olive eyes, making the decoration process quick and fun.
- Medium mixing bowl: A medium mixing bowl allows you to mix the yolk filling thoroughly without making a mess.
- Ziploc or pastry bag: Using a Ziploc or pastry bag simplifies filling the egg bases neatly, so each chick looks professional.
Ingredients
Eggs and Filling
- 12 large eggs (hard boiled and peeled)
- 1/3 cup mayonnaise
- 1 1/2 tsp dijon mustard (or add to taste)
- 1/4 tsp garlic powder
- 1/8 tsp salt (or to taste)
Decorations
- 1 small carrot (peeled and sliced into rings)
- 6 black olives
How to Make Easter Egg Recipe – Deviled Egg Chicks
Step 1: Prepare the Eggs
- Peel 12 hard-boiled eggs.
- With a sharp knife, slice off a very thin layer from the base of each egg. This creates a flat surface for them to stand on.
- Cut off a generous top third of each egg.
- Squeeze gently around the base of each egg; this will help loosen the yolk so it pops right out. Keep lids paired with their bases.
Step 2: Make the Filling
- In a medium mixing bowl, combine all yolks from the hard-boiled eggs.
- Mash well with a fork until crumbly.
- Add in 1/3 cup mayonnaise, 1 1/2 tsp dijon mustard (adjust to taste), 1/4 tsp garlic powder, and 1/8 tsp salt (season as desired).
- Mix until smooth and creamy.
- Transfer this mixture into a Ziploc or pastry bag for easy piping.
Step 3: Assemble Your Chick Eggs
- Pipe the yolk mixture generously into each egg base.
- Place the top third back onto each base and press down slightly so they adhere together.
Step 4: Decorate Your Chick Eggs
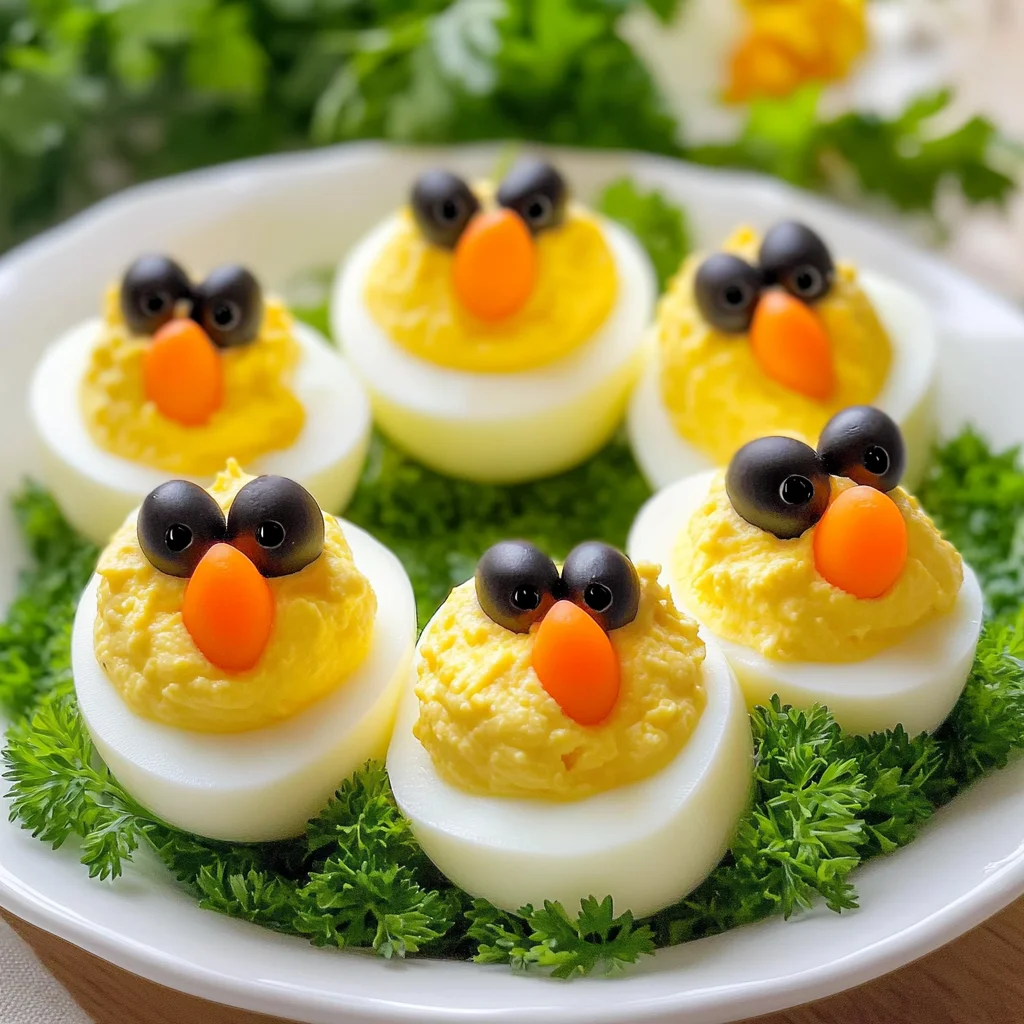
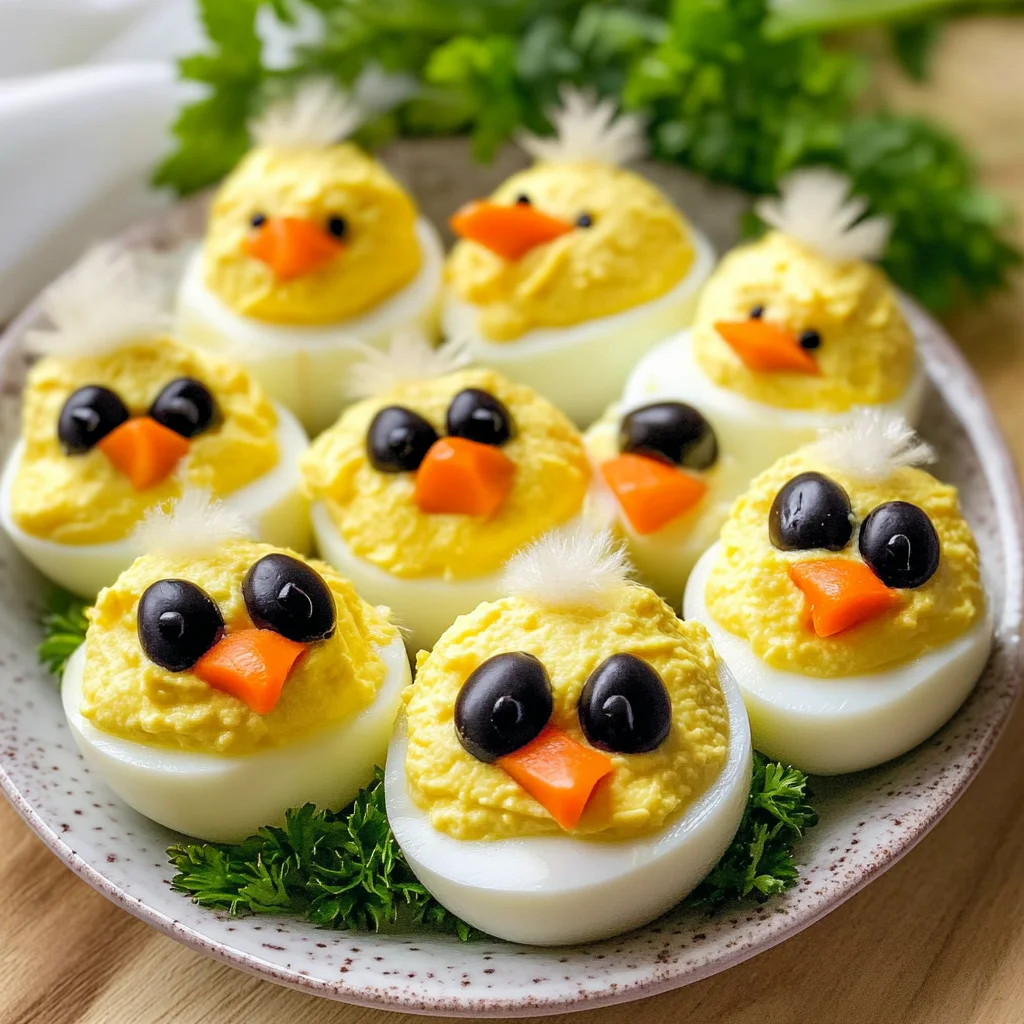
- For eyes, poke through an olive using a plastic straw several times; then squeeze down on the straw to pop out small circles of olive.
- For beaks, thinly slice some carrot rings into sixths.
- Insert two olive spots for eyes on each chick along with two carrot wedges for beaks.
- Arrange your adorable chick deviled eggs on a platter and garnish with fresh parsley or dill for an extra touch!
Enjoy making these festive Easter Egg Recipe – Deviled Egg Chicks with family and friends!
How to Serve Easter Egg Recipe – Deviled Egg Chicks
These adorable Deviled Egg Chicks make a delightful centerpiece for your Easter gathering. Their charming appearance and tasty filling will surely impress your guests. Here are some creative ways to serve them.
On a Colorful Platter
- Arrange the deviled egg chicks on a vibrant platter, surrounded by fresh herbs like parsley or dill to create a garden effect.
With Dipping Sauces
- Serve with an assortment of dipping sauces like ranch, sriracha, or garlic aioli for an interactive appetizer experience.
As Part of a Brunch Spread
- Include the deviled egg chicks in a brunch spread alongside other dishes like salads, pastries, and fresh fruits for a well-rounded meal.
Garnished with Edible Flowers
- Add edible flowers around the chicks for an elegant touch. This presentation enhances the festive look of your dish.
In Individual Cups
- Serve each chick in small cupcake liners or mini cups for easy serving and a fun twist that guests will love.
How to Perfect Easter Egg Recipe – Deviled Egg Chicks
Perfecting your Deviled Egg Chicks is easy with these tips. Follow them to achieve the best flavor and presentation.
- Use Fresh Eggs: Fresh eggs peel more easily and result in better-looking deviled eggs.
- Be Generous with Seasoning: Taste as you go; adjusting salt and mustard can elevate the flavor of your filling.
- Pipe with Precision: Use a piping bag for filling the egg bases neatly; this makes them look professional.
- Chill Before Serving: Refrigerate your chicks before serving to enhance their texture and flavors.
- Experiment with Garnishes: Get creative with garnishes like microgreens or colorful vegetables to enhance visual appeal.
Best Side Dishes for Easter Egg Recipe – Deviled Egg Chicks
Pair your delightful Deviled Egg Chicks with these complementary side dishes for a complete meal. Each option brings its unique flavor to the table.
- Fresh Garden Salad: A light salad made with mixed greens, cucumbers, and cherry tomatoes provides a refreshing contrast to the richness of the eggs.
- Roasted Vegetable Medley: Try seasonal vegetables such as carrots, bell peppers, and zucchini tossed in olive oil and herbs for a flavorful side.
- Quinoa Salad: Nutty quinoa mixed with diced vegetables and lemon dressing adds protein and texture to your meal.
- Garlic Breadsticks: Soft breadsticks brushed with garlic butter make for a comforting addition that pairs well with deviled eggs.
- Creamy Coleslaw: A tangy coleslaw offers crunch and complements the creamy texture of the deviled egg filling beautifully.
- Fruit Platter: A selection of seasonal fruits adds sweetness and color, balancing out savory flavors on your plate.
- Stuffed Mushrooms: Savory mushrooms filled with cheese or herbs provide an earthy taste that enhances your Easter feast.
- Potato Salad: A classic potato salad brings creaminess and heartiness that rounds out the meal perfectly.
Common Mistakes to Avoid
To ensure your Easter Egg Recipe – Deviled Egg Chicks turns out perfectly, avoid these common pitfalls.
- Not using fresh eggs: Fresh eggs are easier to peel and yield better results. Always choose eggs that are not too close to their expiration date.
- Overcooking the eggs: Overcooked eggs can develop a greenish hue around the yolk. Boil the eggs for the right amount of time, usually about 9-12 minutes.
- Ignoring seasoning: Under-seasoned filling can lead to bland deviled egg chicks. Taste the mixture before piping it into the egg base and adjust seasonings as needed.
- Cutting unevenly: For a polished look, cut the tops and bottoms of the eggs evenly. This ensures they stand well and look cute on your platter.
- Skipping garnishes: Garnishes add visual appeal and flavor. Don’t forget to use fresh herbs like parsley or dill to enhance presentation.
- Rushing assembly: Take your time when assembling the chicks. A careful approach will help them look adorable and enticing.
Storage & Reheating Instructions
Refrigerator Storage
- Store deviled egg chicks in an airtight container.
- They can last up to 2 days in the refrigerator.
Freezing Easter Egg Recipe – Deviled Egg Chicks
- It is not recommended to freeze deviled egg chicks as their texture may change when thawed.
- If you have leftover filling, you can freeze it in a sealed container for up to one month.
Reheating Easter Egg Recipe – Deviled Egg Chicks
- Oven: Preheat to 350°F (175°C) and warm for about 10 minutes until heated through.
- Microwave: Use a microwave-safe plate, heat for about 30 seconds, checking frequently.
- Stovetop: Heat gently over low heat in a skillet for a few minutes until warm; cover with a lid to retain moisture.
Frequently Asked Questions
Here are some common questions regarding the Easter Egg Recipe – Deviled Egg Chicks.
How do I make my deviled egg filling creamier?
Adding more mayonnaise or a dash of sour cream can enhance creaminess in your filling.
Can I customize my deviled egg chick decorations?
Absolutely! Feel free to use different vegetables or toppings like bell peppers or cherry tomatoes for added variety.
How do I ensure my egg yolks blend smoothly?
Using a fork or food processor will allow you to achieve a smooth consistency without lumps in your yolk mixture.
How long do deviled eggs last?
Deviled egg chicks can be stored in the refrigerator for up to 2 days, but it’s best enjoyed fresh.
Final Thoughts
These Easter Egg Recipe – Deviled Egg Chicks are not only visually appealing but also versatile enough for any gathering. Feel free to customize them with your favorite seasonings or toppings, making them perfect for Easter celebrations or casual get-togethers. Try this recipe today and impress your family and friends!
Did You Enjoy Making This Recipe? Please rate this recipe with ⭐⭐⭐⭐⭐ or leave a comment.
📖 Recipe Card
Print
Easter Egg Recipe – Deviled Egg Chicks
- Total Time: 30 minutes
- Yield: Serves approximately 12 1x
Description
Easter Egg Recipe – Deviled Egg Chicks are an adorable twist on traditional deviled eggs that will be the highlight of your festive gatherings. These charming little chick-shaped treats feature a creamy filling enhanced with a touch of mustard and garlic, making them irresistible to both kids and adults. Not only do they boast a delightful presentation, but they are also simple to prepare, allowing everyone to join in on the fun. Perfect for Easter brunch or any celebration, these deviled egg chicks offer a playful and delicious way to brighten your table.
Ingredients
- 12 large hard-boiled eggs
- 1/3 cup mayonnaise
- 1 1/2 teaspoons Dijon mustard
- 1/4 teaspoon garlic powder
- 1 small carrot (for decoration)
- 6 black olives (for decoration)
Instructions
- Peel the hard-boiled eggs and slice off a thin layer from the base for stability.
- Cut off the top third of each egg and gently remove the yolk into a bowl.
- Mash the yolks with mayonnaise, Dijon mustard, garlic powder, and salt until smooth.
- Pipe the mixture back into each egg base and replace the tops.
- Create eyes using the black olives and beaks from carrot slices to complete your chick decorations.
- Prep Time: 20 minutes
- Cook Time: 10 minutes
- Category: Appetizer
- Method: Boiling
- Cuisine: American
Nutrition
- Serving Size: 1 deviled egg chick (approximately 45g)
- Calories: 80
- Sugar: 0g
- Sodium: 100mg
- Fat: 7g
- Saturated Fat: 1g
- Unsaturated Fat: 6g
- Trans Fat: 0g
- Carbohydrates: 1g
- Fiber: 0g
- Protein: 5g
- Cholesterol: 185mg