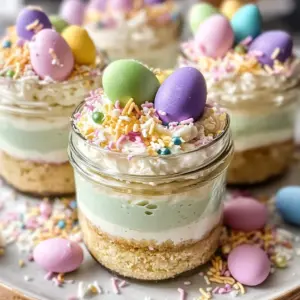
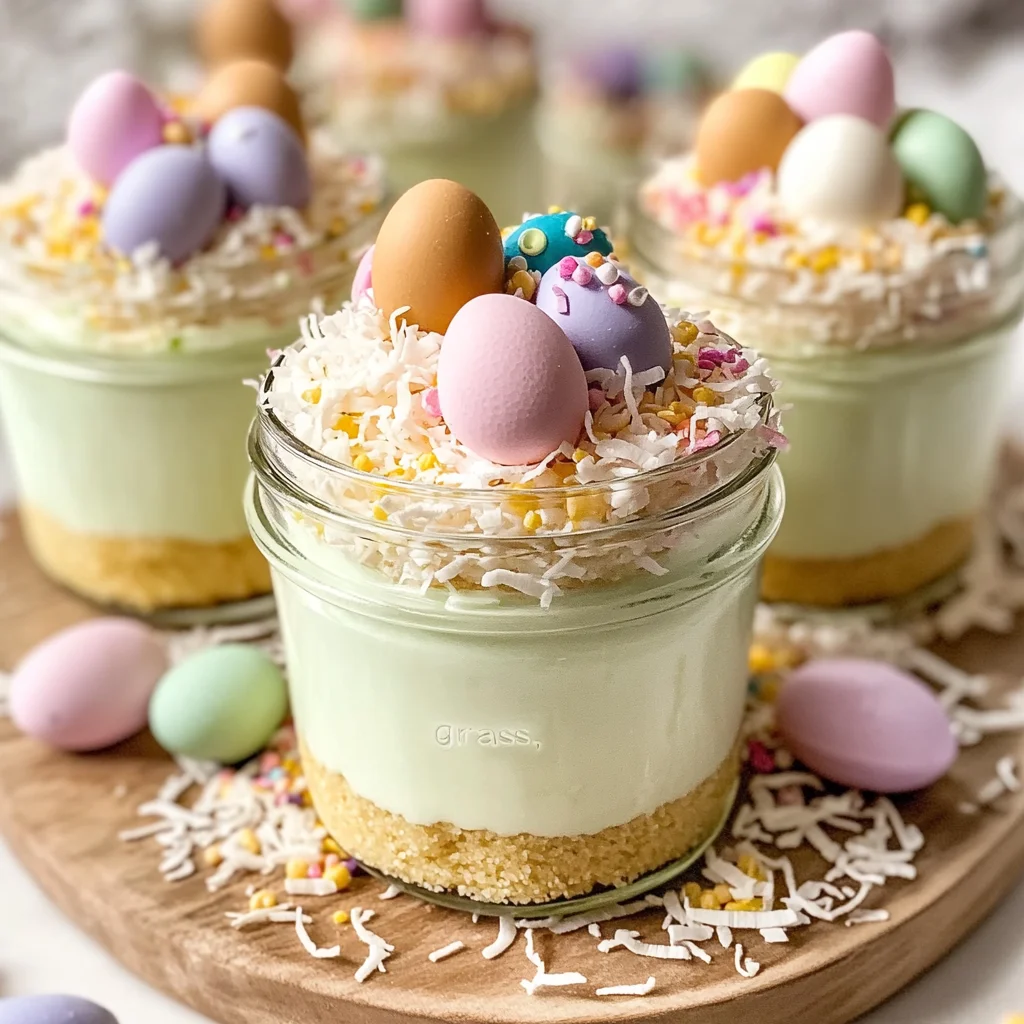
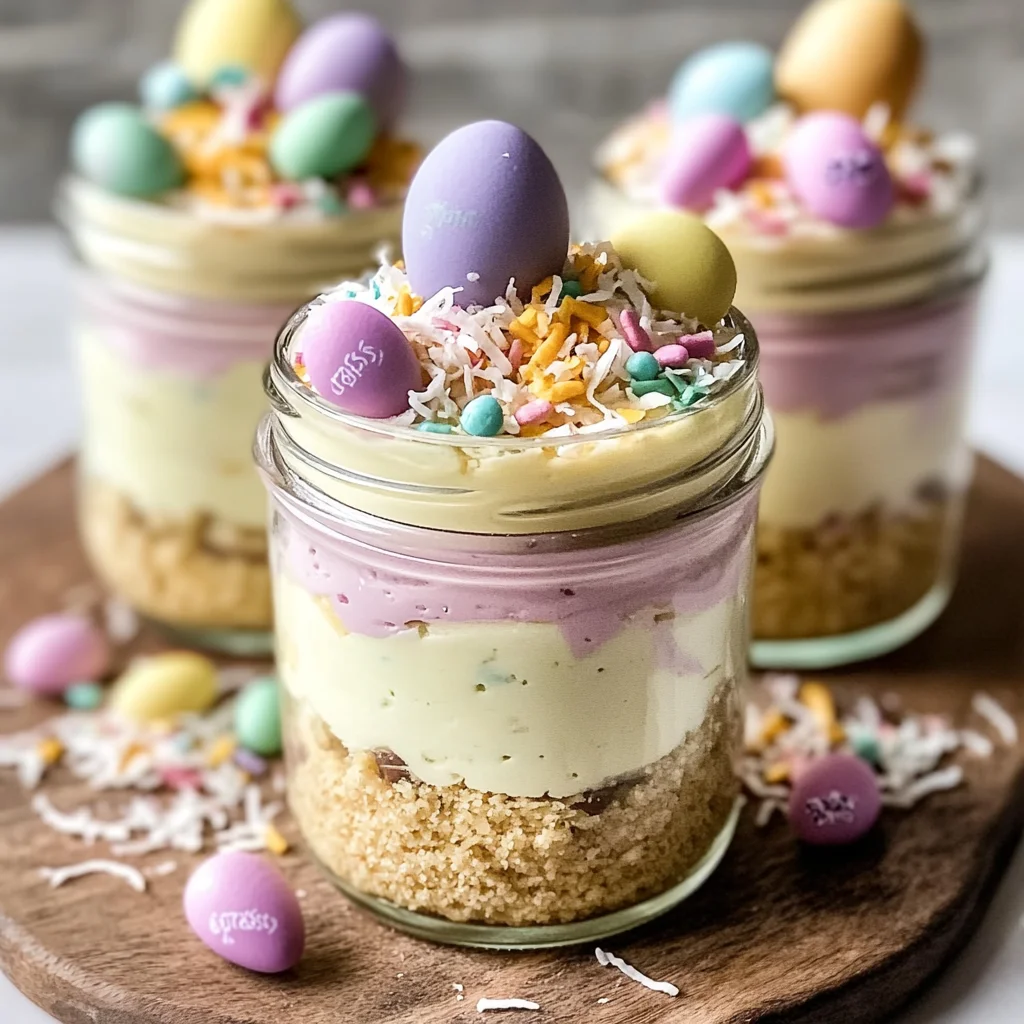
Mini Easter Cheesecake Jars – A Cute, No-Bake Spring Dessert are the perfect treat for your spring celebrations. These delightful jars combine a rich cheesecake filling with a crunchy crust, making them both visually appealing and delicious. Ideal for Easter parties, picnics, or family gatherings, they offer a fun and creative way to enjoy a classic dessert. Plus, their no-bake nature means you can whip them up in no time!

Jump to:
- Why You’ll Love This Recipe
- Tools and Preparation
- Essential Tools and Equipment
- Importance of Each Tool
- Ingredients
- For the Crust
- For the Cheesecake Filling
- Color and Flavor (Optional)
- Toppings
- How to Make Mini Easter Cheesecake Jars – A Cute, No-Bake Spring Dessert
- Step 1: Make the Crumb Base
- Step 2: Pack the Crust
- Step 3: Whip the Cream
- Step 4: Beat the Cream Cheese
- Step 5: Fold it Together
- Step 6: Add Color (Optional)
- Step 7: Fill the Jars
- Step 8: Chill
- Step 9: Decorate
- Step 10: Serve Cold
- How to Serve Mini Easter Cheesecake Jars – A Cute, No-Bake Spring Dessert
- Individual Treats
- Dessert Table Display
- Picnic Idea
- Party Favors
- Themed Parties
- How to Perfect Mini Easter Cheesecake Jars – A Cute, No-Bake Spring Dessert
- Best Side Dishes for Mini Easter Cheesecake Jars – A Cute, No-Bake Spring Dessert
- Common Mistakes to Avoid
- Storage & Reheating Instructions
- Refrigerator Storage
- Freezing Mini Easter Cheesecake Jars – A Cute, No-Bake Spring Dessert
- Reheating Mini Easter Cheesecake Jars – A Cute, No-Bake Spring Dessert
- Frequently Asked Questions
- Can I use a different crust?
- How long do these Mini Easter Cheesecake Jars take to set?
- Are there alternatives for heavy whipping cream?
- Can I customize the flavors of my cheesecake jars?
- What is the best way to serve Mini Easter Cheesecake Jars?
- Final Thoughts
- 📖 Recipe Card
Why You’ll Love This Recipe
- Easy to Make: With simple ingredients and straightforward instructions, you can create these delightful jars in just 20 minutes.
- No-Bake Delight: Perfect for warm weather, there’s no need to turn on the oven!
- Customizable Flavors: Add your favorite flavors or colors to make each jar uniquely yours.
- Perfect Portion Sizes: Individual servings prevent any fuss over cutting cake slices—just grab a spoon and enjoy!
- Visually Appealing: The colorful layers and fun toppings will impress guests of all ages.
Tools and Preparation
Preparing your Mini Easter Cheesecake Jars is a breeze with the right tools. Gather these essentials before you start.
Essential Tools and Equipment
- Small jars (4–6 oz)
- Mixing bowls
- Hand mixer
- Piping bag or spoon
Importance of Each Tool
- Small jars: These are ideal for portion control and presentation, allowing each guest to have their own serving.
- Hand mixer: This tool ensures that your cream cheese mixture is perfectly smooth and fluffy, making for a creamy cheesecake filling.
- Piping bag: Using a piping bag helps achieve neat layers in the jars, enhancing the visual appeal of your dessert.
Ingredients
For the Crust
- 1 1/2 cups grachicken chicken ham cracker crumbs (or digestive biscuits)
- 5 tablespoons unsalted butter (melted)
- 2 tablespoons sugar
- Pinch of salt
For the Cheesecake Filling
- 12 oz cream cheese (softened)
- 1/2 cup powdered sugar
- 1 teaspoon vanilla extract
- 1 tablespoon lemon juice
- 1 cup cold heavy whipping cream
Color and Flavor (Optional)
- A few drops of gel food coloring (pastel shades)
- Lemon zest or almond extract to taste
Toppings
- Mini chocolate eggs or jelly beans
- Pastel sprinkles
- Shredded coconut (optional, dyed green for “grass”)
How to Make Mini Easter Cheesecake Jars – A Cute, No-Bake Spring Dessert
Step 1: Make the Crumb Base
- Stir together grachicken chicken ham crumbs, sugar, salt, and melted butter until the mixture looks like wet sand.
Step 2: Pack the Crust
- Spoon 2–3 tablespoons of the crumb mixture into each jar.
- Press down firmly with the back of a spoon. Set aside.
Step 3: Whip the Cream
- In a cold bowl, whip heavy cream to medium-stiff peaks.
- Chill while you prepare the cheesecake base.
Step 4: Beat the Cream Cheese
- In another bowl, mix softened cream cheese, powdered sugar, vanilla extract, and lemon juice until smooth and fluffy (about 1–2 minutes).
Step 5: Fold it Together
- Gently fold the whipped cream into the cream cheese mixture in two additions until no streaks remain.
Step 6: Add Color (Optional)
- Divide the filling into portions and tint with pastel gel colors if desired. Keep it light for that spring look!
Step 7: Fill the Jars
- Pipe or spoon the cheesecake filling over each crust layer in the jars, leaving some room for toppings.
Step 8: Chill
- Cover and refrigerate for at least 2 hours or up to 24 hours to set.
Step 9: Decorate
- Just before serving, add coconut “grass,” sprinkles, and nestle mini eggs into each jar so they stay crisp.
Step 10: Serve Cold
- Hand out with small spoons and enjoy these creamy, crunchy layers!
How to Serve Mini Easter Cheesecake Jars – A Cute, No-Bake Spring Dessert
Mini Easter Cheesecake Jars are delightful treats that not only taste amazing but also look stunning at any gathering. Here are some creative serving suggestions to make your dessert table shine.
Individual Treats
- Each guest receives their own jar, making it a personal and charming dessert option. This presentation is perfect for parties or family gatherings.
Dessert Table Display
- Arrange the jars on a tiered cake stand for an eye-catching display. Decorate with pastel-colored tableware to enhance the spring theme.
Picnic Idea
- Pack the jars in a cooler for a fun day out. They are easy to transport and provide a sweet treat amid outdoor festivities.
Party Favors
- Give guests a jar as a take-home gift after the celebration. Tie a ribbon around each jar for an extra touch of charm.
Themed Parties
- Customize the toppings to match your party theme. Use different colored sprinkles or themed candies that reflect your event’s decorations.
How to Perfect Mini Easter Cheesecake Jars – A Cute, No-Bake Spring Dessert
Creating the perfect Mini Easter Cheesecake Jars is all about technique and attention to detail. Follow these tips to elevate your dessert.
- Use chilled equipment: Start with cold mixing bowls and beaters to ensure whipped cream reaches its peak texture more easily.
- Avoid overmixing: Gently fold in the whipped cream to maintain its lightness, ensuring that your cheesecake filling stays airy and fluffy.
- Customize flavors: Experiment with different extracts such as lemon or almond for unique flavor variations tailored to your taste.
- Layer creatively: Alternate layers of filling and crust for visual appeal, making each bite a delightful mix of creamy and crunchy textures.
- Chill thoroughly: Allow sufficient chilling time for the jars; this helps achieve the perfect consistency and enhances flavors.
- Garnish right before serving: To keep toppings fresh and crisp, add them just before serving for optimal presentation.
Best Side Dishes for Mini Easter Cheesecake Jars – A Cute, No-Bake Spring Dessert
Pairing delicious side dishes with your Mini Easter Cheesecake Jars can enhance the overall dining experience. Here are some great options:
Fresh Fruit Salad
A colorful mix of seasonal fruits like strawberries, blueberries, and kiwi adds freshness and balances sweetness.Veggie Platter with Hummus
Crisp vegetables served with creamy hummus offer a healthy contrast to the rich cheesecakes.Spring Greens Salad
Lightly dressed mixed greens topped with nuts and berries provide a refreshing bite alongside the desserts.Cheese Board
A selection of cheeses paired with whole-grain crackers creates a savory complement to the sweet jars.Mini Quiches
Bite-sized quiches filled with vegetables or cheese make for an easy yet elegant savory option at brunch gatherings.Pasta Salad
A cold pasta salad tossed with vegetables and vinaigrette offers hearty satisfaction that pairs nicely with sweet desserts.Savory Scones
Herb-infused scones add an interesting flavor dimension while remaining light enough not to overpower the cheesecake.Chocolate-Covered Strawberries
These classic treats bring elegance and indulgence, perfectly matching the festive spirit of Easter celebrations.
Common Mistakes to Avoid
When making Mini Easter Cheesecake Jars, it’s easy to overlook some important steps. Here are a few common mistakes to watch out for:
Bold ingredient measurements: Always use precise measurements for the ingredients. Too much or too little can affect the texture and flavor of your cheesecake.
Bold rushing the chilling process: Be sure to allow enough time for your Mini Easter Cheesecake Jars to chill. Rushing this step can result in a runny filling.
Bold overmixing the cream cheese: Mix your cream cheese mixture just until smooth. Overmixing can incorporate too much air, leading to cracks in your cheesecake.
Bold using warm ingredients: Ensure that all your ingredients are at room temperature before starting. Cold cream cheese can lead to lumps in the filling.
Bold skipping decoration: The visual appeal is key! Don’t forget to add creative toppings like coconut grass or chocolate eggs for that festive touch.
Storage & Reheating Instructions
Refrigerator Storage
- Store Mini Easter Cheesecake Jars in an airtight container.
- They can be kept in the refrigerator for up to 3 days.
Freezing Mini Easter Cheesecake Jars – A Cute, No-Bake Spring Dessert
- You can freeze these jars for up to 1 month.
- Make sure they are tightly sealed to avoid freezer burn.
Reheating Mini Easter Cheesecake Jars – A Cute, No-Bake Spring Dessert
- Oven: Not recommended; best served chilled from the fridge.
- Microwave: Do not microwave; it alters texture.
- Stovetop: Not applicable; serve cold for best flavor.
Frequently Asked Questions
Here are some common questions about Mini Easter Cheesecake Jars:
Can I use a different crust?
You can substitute graham cracker crumbs with crushed digestive biscuits for a different flavor profile.
How long do these Mini Easter Cheesecake Jars take to set?
They need at least 2 hours in the refrigerator, but overnight is ideal for best results.
Are there alternatives for heavy whipping cream?
Yes! You can use coconut cream as a dairy-free alternative for whipping.
Can I customize the flavors of my cheesecake jars?
Absolutely! Feel free to add extracts or citrus zest according to your taste preferences.
What is the best way to serve Mini Easter Cheesecake Jars?
Serve them chilled directly from the fridge with small spoons for easy enjoyment!
Final Thoughts
Mini Easter Cheesecake Jars are not only adorable but also versatile. They can be customized with various flavors and toppings, allowing you to create a unique dessert for any occasion. Try them this spring and impress your friends and family with these cute no-bake delights!
Did You Enjoy Making This Recipe? Please rate this recipe with ⭐⭐⭐⭐⭐ or leave a comment.
📖 Recipe Card
Print
Mini Easter Cheesecake Jars – A Cute, No-Bake Spring Dessert
- Total Time: 0 hours
- Yield: Makes approximately 6 servings 1x
Description
Indulge in the delightful Mini Easter Cheesecake Jars, a no-bake spring dessert that combines creamy cheesecake filling with a crunchy crust, all beautifully presented in individual jars.
Ingredients
- 1 1/2 cups graham cracker crumbs (or digestive biscuits)
- 5 tablespoons unsalted butter (melted)
- 12 oz cream cheese (softened)
- 1/2 cup powdered sugar
- 1 teaspoon vanilla extract
- 1 tablespoon lemon juice
- 1 cup cold heavy whipping cream
- A few drops of gel food coloring (pastel shades)
- Lemon zest or almond extract to taste
- Mini chocolate eggs or jelly beans
- Pastel sprinkles
- Shredded coconut (optional, dyed green for “grass”)
Instructions
- In a bowl, stir together graham cracker crumbs, sugar, salt, and melted butter until the mixture looks like wet sand.
- Spoon 2–3 tablespoons of the crumb mixture into each jar and press down firmly with the back of a spoon. Set aside.
- In a cold bowl, whip heavy cream to medium-stiff peaks; chill while preparing the cheesecake base.
- In another bowl, mix softened cream cheese, powdered sugar, vanilla extract, and lemon juice until smooth and fluffy (about 1–2 minutes).
- Gently fold the whipped cream into the cream cheese mixture in two additions until no streaks remain.
- Optionally, divide the filling into portions and tint with pastel gel colors for a spring look.
- Pipe or spoon the cheesecake filling over each crust layer in the jars, leaving some room for toppings.
- Cover and refrigerate for at least 2 hours or up to 24 hours to set.
- Just before serving, add coconut “grass,” sprinkles, and nestle mini eggs into each jar.
- Prep Time: 20 minutes
- Cook Time: None
- Category: Dessert
- Method: No-Bake
- Cuisine: American
Nutrition
- Serving Size: 1 serving
- Calories: 360
- Sugar: 13g
- Sodium: 180mg
- Fat: 28g
- Saturated Fat: 16g
- Unsaturated Fat: 10g
- Trans Fat: 0g
- Carbohydrates: 27g
- Fiber: 1g
- Protein: 4g
- Cholesterol: 95mg